To create an Entity you must first create at least one Entity Type entry in the Auxiliary Data page.
This procedure is mandatory.
In the Entities Management page, click on Insert and please fill in these following fields:
- Entity Name.
- Tax Number.
- Address: The address added here will be available at the locations page.
- Postal Code.
- Phone: Should you wish to add several numbers separate them by /
- Mobile Phone: Should you wish to add several numbers separate them by /
- Fax: Should you wish to add several numbers separate them by /
- Email.
- MSN Contact.
- Web: The URL of the Entity's web page
- Company domain: The Entity's Domain, (multiple domains separated by ; ).
- Birthday: Choose (/day / month / year/).
- BIN: Type in the Bank Identification Number of the Entity.
- Country: To choose a country you'll have to create an entry in Auxiliary Data.
- State: To choose a State you'll have to create an entry in Auxiliary Data.
- Province: To choose a Province you'll have to create an entry in Auxiliary Data.
- Region: To choose a Region you'll have to create an entry in Auxiliary Data.
- E.A.C.: To choose an EAC you'll have to create an entry in Auxiliary Data.
- Associated Group: To choose an Associated Group you'll have to create an entry in Auxiliary Data.
- EXTRA: You'll have to create an entry in Auxiliary Data (Under the name Aditional Field).
- IPBrick phone: Choose the Entity's phone registered in the IPBrick server.
- Comments: Add any comments you'd like to make.
- Extra Field: Create an aditional field.
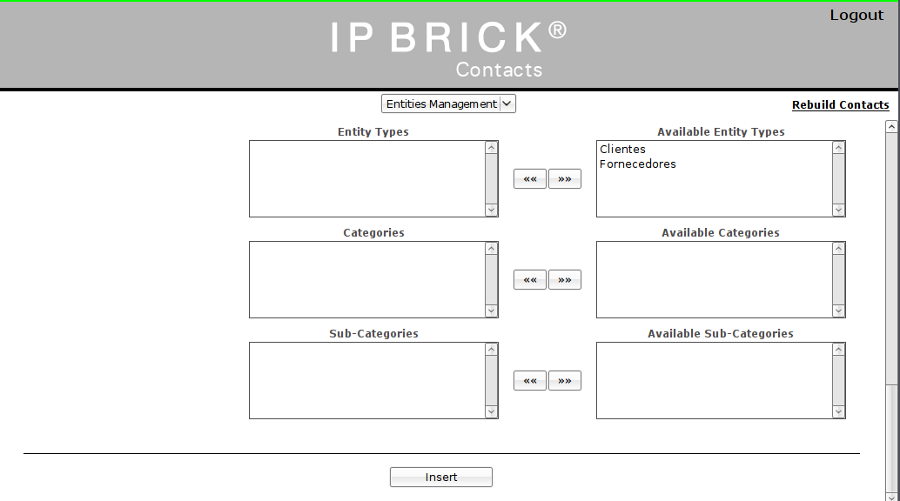
On the bottom of the page, These following boxes (Figure 16.8), show the available Entity Types, Categories and Sub-Categories, you have pre-defined in Auxiliary Data, they will serve to categorize the Entity you are creating.
Figure 16.8:
Entities Management Association Boxes
|
|
- Available Entity Types - This box shows the available Entity Types that were created in the Auxiliary Data Menu.
You have to choose the Type of Entity you want by clicking on it, after which you should click on the arrow pointing
in the direction of the Entity Types box.
- Entity Types - This box shows the Type of Entity selected from the list of available types, you can also remove a type
by selecting it and clicking on the arrow pointing to the Available Entities Types box.
- Available Categories - This box shows the available Categories that were created in the Auxiliary Data Menu,
you have to choose the category you want and click on the arrow pointing in the direction of the Categories box.
- Categories - This box shows the Category selected from the list of Available Categories. You can also remove a Category by selecting it and clicking on the arrow pointing to the Available Categories box.
- Available Sub-Categories - This box shows the available Sub-Categories that were created in the Auxiliary Data Menu,
you have to choose the Sub-Category you want and click on the arrow pointing in the direction of the Sub-Categories box.
- Sub-Categories - This box shows the Sub-Category selected from the list of Available Sub-Categories.
Click on Insert to save.
After creating an Entity you can check if all the data inserted is correctly and ,if not, just click on Modify or Delete if you wish to
erase the entry.
iPortalMais