Next: Music on Hold Up: VoIP Previous: Call manager Contents
In order for IPBrick to execute the routing of calls between the several network interfaces, it is necessary to define the specific routes according to a telephony numbering.
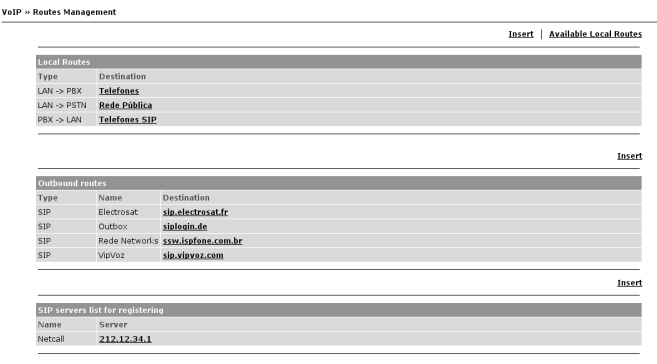
As you can see in Figure 4.92 we have this options:
Local routes
Local routes (Figure 4.93) allow the configuration of an interconnection between LAN, PSTN, PBX or INTERNET.
The possible options by default are:
If there are other configured interfaces (acting like trunks), they may be added to the list of routes, and for that it is necessary to click the connection Available Local Routes (Figure 4.93) and then add the necessary routes.
The Insert in the top menu allows to insert one of the routes mentioned. After insertion, each type of route has a connection that allows its configuration. When acceding to this interface it is possible to choose one of these options:
Back
Modify: To change the type of local route;
Delete: Remove the local route;
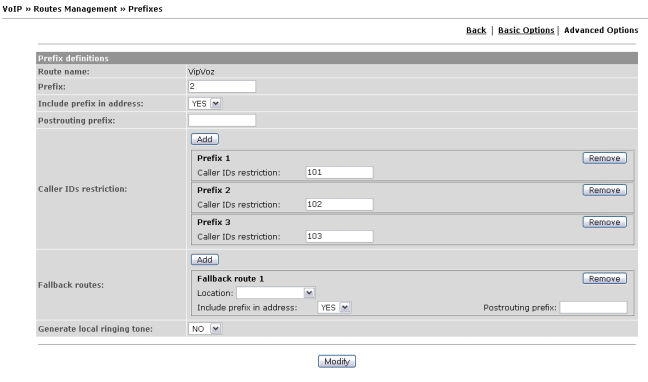
Insert: It allows to add the prefixes that must be added to this route. When you indicate a prefix, all the calls whose initial digits coincide with that digit are routed by that route. Choosing Advanced Options we have this options (Figure 4.95):
Prefix: The numeric prefix to use to make calls using that route;
Include prefix in address: If Yes the prefix will be part of the destination number, so the prefix will be maintained when the call is routed. If No the prefix will be used only to identify the route. Example: To enable the use of number 6 to route a call to the Portuguese PSTN network, it is necessary to remove this prefix in order that the number stays with the correct format (the format 2XXXXXXXX instead of 62XXXXXXXX).
Postrouting prefix: It's a prefix added by the IPBrick when the number is received. Example: For the Portuguese PSTN network we use the format 2XXXXXXXX. If we use has main route a SIP account route it's necessary to use prefix 2, include prefix in address and use a postrouting prefix with 00351 (351 is the portuguese international code);
Caller IDs restriction: Will restrict the route only for the listed caller ID's;
Fallback routes: It's a backup route to use if the present one fails;
Generate local ringing tone: Will generate a local ringing tone. Can be used when it can't ring at the destination phone;
Priority: Define the prefix priority level.
Outbound routes
This option turns possible to configure which calls shall be routed to a external server which shall be responsible for routing them to their destination (Figure 4.94). This routing is made through prefixes that may be inserted clicking the name of the route and then the link Insert above the prefixes table. To change or remove a route you only have to click its name and then the option Modify or Delete, respectively.
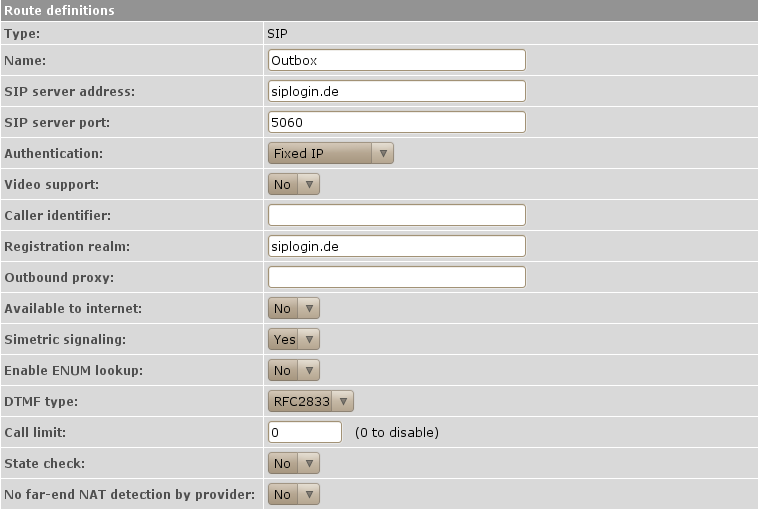
To add a new outbound route click Insert. The Basic Options are:
Type: Type of signalling protocol to use: Can be SIP, SIP with TLS or IAX;
Name: Outbound server name;
Server Address: Server IP/name address;
Authentication: If it is necessary to make authentication in server, you shall have to choose the option User/Password and fulfil the users name and respective password;
Choosing Advanced Options the following parameters will be presented:
Server Port: Server port to use;
Video support: If the VoIP server supports video, you can enable that option;
Caller identifier: Outbound caller ID masking;
Registration realm: Realm is usually the SIP server FQDN but some SIP servers have different server address and registration realm;
Outbound proxy: Usually not used but is a server that passes the SIP messages between the SIP client and the SIP proxy server;
Available to Internet: With this option selected, the route shall be available for VoIP telephones outside the LAN;
Simetric signalling: It allows to define if signalling is sent and received through the same port (5060);
Activate ENUM search: It allows IPBrick to search through ENUM.4.22
DTMF type: Type of DTMF4.23 to use. Options: RFC2833 (default), Inband, Info and Auto;
Call limit: Number of possible simultaneous calls using that route, that can be useful for bandwidth control. With 0 we can disable it;
State check: This feature permits you to verify if the entity is online or not, i.e.: on a phone it will check if there's online activity, if wether by accident or deliberate the IPBrick will know that the entity is no longer available. By default this field is set to No;
No far-end NAT detection by provider: This option applies in a context where there's a route to a operator that also sends calls, i.e. not just a an outbound operator.
If the outbound route type is IAX, the only parameters are:
Name;
Server Address;
Server Port;
Available to Internet;
Call limit.
The prefixes inserted in these outbound routes shall be available automatically for the SIP telephones and the telephones connected to PBX. If there are additional interfaces and you intend to use a outbound route, it is necessary to add the route INTERFACE->INTERNET (for example PBX1->INTERNET or GSM->INTERNET), include in that route a prefix matching the one of the route for the SIP server and include the prefix (in option Include prefix choose Yes).
For each outbound route it's possible to define which codecs will be used (option Modify and their priority with the option Order.
SIP servers list for registering
Here it's possible to visualize the SIP4.24 address list which have already been configured (Figure 4.96). When inserting a new one, the page generated asks for the following data:
Name: Server name;
SIP server address: SIP server IP or address. It is possible to specify the port number along with the SIP IP address as: <server address>:<port number> (e.g: 212.12.34.1:5090)
After typing in the data, it is necessary to click the button Insert to confirm the address. The next step is to register accounts to the local SIP server. Pressing Insert we have this options:
Login: SIP account login. Normally it's the nomadic SIP number;
Authentication user: Usually the same as the login;
Password: SIP account password;
Note: To configure the internal number to where the operator will transfer the incoming calls from the Internet to that nomadic number, just create a Phone at Phones Management, IVR, Call Group etc. at Functions > Inbound.
Note: In order to define the destination of the received calls, you should configure a Speed Dial or use a function to that purpose.